Sunday, August 30, 2015

Log to a list when a document has been opened

This code used JSLink / Client side rendering and will therefore only work in SharePoint 2013.

What does this solution do?

This code  adds a custom link to open a document in the browser. Before opening the document the code writes the document name to a list to track that the current user has clicked the link.

This is a basic example, and you can use it as a starting point for your custom solution.

Setup

The code

Start by adding this code to a file in the site where you plan to use the code:

/*
JSLink code to log when a Document has been opened.
--------------------------
Author: Alexander Bautz / SPJSBlog.com
*/

var spjs_currDocInfo = {};

function spjs_logLinkClick(ctx){
var a, b = "", c = "";
a = ctx.CurrentItem;
spjs_currDocInfo[a.ID] = a;
c = a.FileLeafRef.substring(a.FileLeafRef.lastIndexOf(".")+1);
b = "<a class="ms-listlink" title="Open document and log to a list that you have opened this document.">"+"<img style="height: 16px; width: 16px; border: 0; vertical-align: top; margin-right: 3px;" src="/_layouts/15/images/ic"+c+".png" alt="" />"+a.FileLeafRef+"</a>";
return b;
}

function openDocAndLog(id){
var cc = new SP.ClientContext.get_current(), list = cc.get_web().get_lists().getByTitle('DocumentsOpenedLog'), nItem = list.addItem(new SP.ListItemCreationInformation());
nItem.set_item('Title', spjs_currDocInfo[id].FileLeafRef);
nItem.update();
cc.load(nItem);
cc.executeQueryAsync(
function(sender, args) {
SP.UI.ModalDialog.commonModalDialogOpen(_spPageContextInfo.webAbsoluteUrl+"/_layouts/15/WopiFrame.aspx?sourcedoc="+spjs_currDocInfo[id].UniqueId+"&action=interactivepreview",{"allowMaximize":true,"showMaximized":true,"showClose":true});
},
function(sender, args) {
alert('Error: ' + args.get_message());
}
);
}

var spjsOpenDocument = {};
spjsOpenDocument.Templates = {};
spjsOpenDocument.Templates.Fields = {
"SPJS_DocLink": {
"View":function(ctx){return spjs_logLinkClick(ctx);}
}
};
SPClientTemplates.TemplateManager.RegisterTemplateOverrides(spjsOpenDocument);

Add field to document library

Then you must add a new field to the document library named “SPJS_DocLink”. This is a calculated column with a blank formula:

=""

When the column has been created, you can rename it to for example “Open document with tracking”.

Add the field to the list view, and remove the “Name” column to prevent the users from opening the document with another method

Add JSLink scrip to the field

Use the Field JSLink too for SharePoint 2013 tool for setting the link to the JSlink file in the current field.

The path to use is the site relative path to the file you stored the above code example in. Use this format:

~site/DocLib/FileName.js

Add the list for logging the opening of documents

You must add a list to store log of the opened documents. This list must be placed in the same site as your document library.

The list must be named “DocumentsOpenedLog” as this is the name used in the code example. If you decide to change the display name of this list, you need to modify the code to use the new name.

In this example, the only field used in the “DocumentsOpenedLog” list is the Title. Therefore it is not necessary to add any more fields to this list.

Test the link

Go to your list view and click the link in the new field. The document should open in a dialog, and the “DocumentsOpenedLog” should show a new record with the document name in the “Title” field, and the name of the current user in the “Created by” field.

Discuss this code example in the forum

Alexander


by Alexander Bautz via SharePoint JavaScripts

Friday, August 28, 2015

Microsoft Beefs Up DLP in SharePoint Server 2016 IT Preview

Microsoft has boosted the data loss prevention capabilities in SharePoint Server 2016 IT Preview, including new support for sensitive information types.

read more


by via SharePoint Pro

Learn SharePoint 2016 from some of the best in the business

The Collab365 Global Conference is just 6 weeks away now (arghh!) and with the launch of the Agenda this week it’s been full steam ahead.

Amidst the flurry of activity required in setting up the data for the 120 or so sessions, a little announcement dropped in from our lovely direction setters at Microsoft.

The long awaited SharePoint 2016 Preview is here !!!

To celebrate this announcement, we are extremely delighted to announce that we will have plenty of content covering SharePoint 2016 via our fantastic line up of speakers. Here’s a taste of what’s coming up on October 7th from 8pm (UTC).

What’s new in SharePoint 2016 for the IT Pro?

Learn everything that is new in SharePoint Server 2016 with MVP, Vlad Catrinescu! He will be looking at all the new features and changes in SharePoint Server 2016 especially those that affect SharePoint Administrators. Find out about SMTP Connection Encryption, Roles & Services, MinRole, Deprecated Features (Excel Services, FIM), User Profile Synchronization, Cloud Search Service Application,  New Boundaries and more …

What’s new in SharePoint 2016 for the Power User?

From the beautiful country of Sri Lanka, Joy Rathnayake will be bringing you an exclusive session for Power Users in SharePoint 2016 covering brand-new features available, enhancements that power-users can exploit, and new/enhanced customisation features.

What’s new in SharePoint 2016 for the Developer?

To complete the set of roles, we are also really excited to announce that Sebastien Levert will be given his version of what’s new for the developer in SharePoint 2016. These 3 sessions will have something for everyone so be sure to register!

Collab365 Live show…

Finally, if that’s not enough Andy Talbot will be hosting a fantastic panel of industry experts to find out more about the Hybrid / SharePoint 2016 story

There will be more. We just cant fit it all in a blog post !

Dont forget to register now so you don’t miss out.

find the original post here : 

http://ift.tt/1KpghXA


by Jon Manderville via Everyone's Blog Posts - SharePoint Community

Thursday, August 27, 2015

Reasons to [Still] Love SharePoint’s SOAP Web Services

There are still reasons to love the SOAP Web Services (hopefully using SPServices!) even though they have been deprecated by Microsoft in SharePoint 2013 (and one can assume to upcoming SharePoint 2016) and SharePoint Online.

There are times when the REST API just doesn’t provide functionality we need, and the SOAP Web Services are a useful fallback when that’s the case.

I’ve run into two very specific instances where this was the case lately. Since Microsoft is actively trying to get REST up to snuff, I’ve added requests to the SharePoint User Voice for both of these. If you would like to see these fixed, please go to the User Voice links and vote them up. While we’re waiting, though, it’s SOAP to save the day.

Recurring Calendar Events

It’s extremely common to have recurring events in a SharePoint Calendar list. Usually this type of event is used for a recurring meeting, or it could just be a placeholder to remind a team to check something, etc.

If you’re building client-side functionality, you may want to do something like retrieving all of the occurrences of events to show in a widget like fullcalendar. Unfortunately, the REST API doesn’t know from recurrence.

There’s a sample at the OfficeDev/PnP repo, but if you run through it, you’ll see it’s pretty ugly. Ingenious, but ugly.

You can pass a CAML fragment into your REST call to augment the OData request, and here’s a different example of how that can work:

// Example from http://ift.tt/1EnOwxU
$.ajax({ 
  url: _spPageContextInfo.webAbsoluteUrl + "/_api/web/lists/getbytitle('Tasks')/GetItems(query=@v1)?@v1={\"ViewXml\":\"<View><Query><Where><And><Neq><FieldRef Name='Status' /><Value Type='Choice'>Completed</Value></Neq><Membership Type='SPWeb.Groups'><FieldRef Name='AssignedTo' /></Membership></And></Where></Query></View>\"}", 
  type: "POST", 
  headers: { 
      "X-RequestDigest": $("#__REQUESTDIGEST").val(), 
      "Accept": "application/json;odata=verbose", 
      "Content-Type": "application/json; odata=verbose" 
  }, 
  success: function (data) { 
    if (data.d.results) { 
      // TODO: handle the data  
      alert('handle the data'); 
    } 
  }, 
  error: function (xhr) { 
     alert(xhr.status + ': ' + xhr.statusText); 
  } 
});

But if you need to do that, I don’t see why you wouldn’t just use SOAP.

User Voice: Add support for recurring events in the REST API

Lookup Site Columns in Other Webs

A good information architecture usually includes some list-based lookup columns. A simple example might be a list stored in the root site of a Site Collection to contain information about all of your organization’s offices. You might store things like:

  • Name of Office (using the Title column)
  • Address
  • City
  • State
  • Postal Code
  • Office Manager
  • Phone Number
  • Industry Focus
  • etc.

Then you might have a Site Column called Office Name that is a Lookup column into the Title column of that list. This enables you to offer a consistent list of options for Office Name to choose from throughout the Site Collection along with the other information (as needed), either for display purposes or for inclusion as data in other lists.

If you try to make a REST call which requests data in a column like this – when you aren’t in same site as the list – you’ll get an error like this:

{"error":{"code":"-1, Microsoft.SharePoint.SPException","message":{"lang":"en-US","value":"The field 'MyLookupColumn' is not supported in query. The lookup list is in another web."}}}

Uh-uh, it’s back to SOAP again.

User Voice: Enable support for lookup columns in other webs in the REST API


In case you were going to ask, I avoid CSOM/JSOM. I see it as a dead end – in this context, at least. More of Microsoft’s effort is going into REST, which is based on Web standards rather than a Microsoft-only approach.

What about you? Do you still see uses for SOAP where REST won’t do it? Respond in the comments if you know of other holes in the REST Swiss cheese.


by Marc D Anderson via Marc D Anderson's Blog

Seattle Area Workshop on SharePoint 2016 & Office 365 Digital Workplace

        When: Sep 16, 8:30am-1PM Cost: Free (includes coffee or juice & lunch) Where: Microsoft Civica Building  1st Floor Conference Room (behind the fireplace) 205 108th Ave NE, Bellevue, WA 98004 Limited Seating – Registration Recommended This event will likely sell out early!    Register Now!  This training is designed to help you understand what is [&hellip

The post Seattle Area Workshop on SharePoint 2016 & Office 365 Digital Workplace appeared first on CollabShow.


by Joel Oleson via CollabShow

Top 10 Improvements in SharePoint 2016 for Business Users

All this talk of IT Pro SharePoint 2016 What’s New and SharePoint 2016 What’s in it for Developers made me decide there really needs to be some messaging for the users. There’s definitely business value in the box, but the usability, performance, and improvements for mobility and integration with everyday life that make a difference [&hellip

The post Top 10 Improvements in SharePoint 2016 for Business Users appeared first on CollabShow.


by Joel Oleson via CollabShow

Wednesday, August 26, 2015

10 Things You Need to Know About SharePoint 2016 Preview

Microsoft has met its self-imposed deadline to release the SharePoint Server 2016 Preview before the end of August, and now the testing begins.

read more


by via SharePoint Pro

DFFS, vLookup and SPJS-utility BETA 2

I have finally finished BETA 2 of the latest update of Dynamic Forms For SharePoint, vLookup for SharePoint and SPJS-utility.js.

DFFS

This update of DFFS started out as a relatively small update to support the new “add children from NewForm” in vLookup, but one thing lead to another. I have now redesigned the entire trigger handling in DFFS, and added a few new features. Here is a few lines describing the changes.

  • Rules can now be ordered as you like – rules related to one trigger does not have to be grouped together anymore.
  • Changed how rule reversing are handled to how it was before v4.301. In v4.301 I changed this to loop trough all rules that should be reversed, and to apply a “summary” of all these reversed rules after all reversals had been looped trough. This was done to try to fix a performance issue in IE8. I have now gone back to handling all rules one by one as part of a major redesign of the trigger handling. Please report any performance issues related to large lists with a lot or rules.
  • Added new trigger on people pickers in SP2013. If I get feedback that this works, I could add support for SP2010 and possibly SP2007 also.
  • Added new option to “Stop and skip to another rule”. This feature adds a kind of branching to the rule handling.
  • Added option to use “not true” in the “And these rules or functions = true / false” option in the trigger.
  • Added option in the Misc tab to “Launch EditForm in dialog” to be able to return to the DispForm after EditForm is submitted.
  • Fixed potential license validation error when using JSLink version with Google Chrome.
  • Added support for checking
  • Changed the order of Tabs and Rules tab in DFFS backend.
  • Changed layout and color scheme in DFFS backend.
  • Various small refinements of the code.
Download files

Please note that the DFFS, vLookup and other plugins are the same for the “CEWP” version and the “JSLink” version. I have however added the files in both “formats” to the download and install page.

vLookup
  • Changed handling of lookup columns when adding children to remove some internal functions in vLookup, and instead use the corresponding spjs-utility function. Please note that you must update to the latest spjs-utility version. This update is also done in vLookup receiver for NewForm.
  • Various small bugfixes and enhancements to both frontend and backend.
SPJS-utility.js
  • Various small changes related to setting lookup columns and other small fixes related to the changes introduced in BETA 1.
Feedback

Please report all issues in the forums. Let me know if you find any bugs – or if you like what you see.

Alexander


by Alexander Bautz via SharePoint JavaScripts

SP2016 - O365 - SP.MoveCopyUtil - Javascript Copy - Move Files and Folder

SharePoint 2016 (Preview) has the Copy / Move files or folders api using CSOM and JSOM. 

The SP.js contains the following api's,

  • SP.MoveCopyUtil.copyFile
  • SP.MoveCopyUtil.copyFolder
  • SP.MoveCopyUtil.moveFile
  • SP.MoveCopyUtil.moveFolder

Each of the method takes 3 parameters,

  • context - current context
  • source url - Full source url of the file / folder.
  • destination url - Full destination url of the file / folder.

SP.MoveCopyUtil.copyFile: This copies the specified file to the destination url.

var context = SP.ClientContext.get_current();
SP.MoveCopyUtil.copyFile(context,"http://sp2016/sitepages/home.aspx","http://sp2016/sitepages/home1.aspx"); context.executeQueryAsync(function(){},function(){});

The above code copies the /sitepages/home.aspx file to sitepages/home1.aspx with all the metadata including createdtime, author etc.

SP.MoveCopyUtil.copyFolder: Copies the specified folder to the destination url including the files within it.

var context = SP.ClientContext.get_current();
SP.MoveCopyUtil.copyFolder(context,"http://sp2016/sitepages/homeFolder","http://sp2016/sitepages/HomeFolder1") context.executeQueryAsync(function(){},function(){});

SP.MoveCopyUtil.moveFolder: Moves the specified folder to the destination.

var context = SP.ClientContext.get_current();
SP.MoveCopyUtil.moveFolder(context,"http://sp2016/sitepages/homeFolder","http://sp2016/pages/HomeFolder1"); context.executeQueryAsync(function(){},function(){});

SP.MoveCopyUtil.moveFile: Moves the specified file to the destination url.

var context = SP.ClientContext.get_current();
SP.MoveCopyUtil.moveFile(context,"http://sp2016/sitepages/home1.aspx","http://sp2016/pages/home1.aspx"); context.executeQueryAsync(function(){},function(){});

The equivalent CSOM api is also available within the Microsoft.SharePoint.Client.MoveCopyUtil. The above api's are also available within O365.


by Balamurugan Kailasam via Everyone's Blog Posts - SharePoint Community

#SP2015-29: SharePoint 2016 Special Newsletter

Howdy SharePoint People

This week we have some really exciting news! SharePoint 2016 Preview got released by Microsoft yesterday. To find out more check out some of the links below.

THE BIG SHAREPOINT 2016 RESOURCE LIST

It's pretty hard scanning the internet for news on SharePoint 2016, so we've put together a post that we'll be updating regularly. It's already packed full of info including details of a working live preview!

http://ift.tt/1JykHL0

COLLAB365 GLOBAL CONFERENCE - 4 SHAREPOINT 2016 SESSIONS NOT TO MISS!

Now that the preview has officially been announced, we are ready to lift the lid on 4 exciting sessions and discussions that we are hosting at the Collab365 Global Conference on October 7th (Online). Read more about them below and make sure you register to reserve your place!

http://ift.tt/1Jw4txD

POLL: 30% OF ORGANIZATIONS WILL ADOPT SHAREPOINT 2016 IMMEDIATELY

We've be running a new poll on SharePoint-Community.net for the last few days and the scores on the doors are that a wapping 30% of organizations will adopt SharePoint 2016 IMMEDIATELY and only 7% of respondants say they will NEVER install it.

http://ift.tt/1JykHL1

DOWNLOAD SHAREPOINT 2016 PREVIEW

If you haven't already, head over to the link below and get all the install goodies for SharePoint 2016! P.S. Let us know what you think of the new version on SharePoint-Community.net.

http://ift.tt/1Jw4stG

*SPONSORED* TAKE PART IN THE DOCUMENT MANAGEMENT SURVEY - WIN A SURFACE!

Fifty Five and Five are running a survey to understand what document management systems people use at work. Enter a quick 5 minute survey and you can win a Microsoft Surface 3 for your troubles.

http://ift.tt/1JykHL5

SHAREPOINT 2016 PREVIEW - GOING HYBRID

Jeff Adkin takes a look at the Hybrid functionality in SharePoint 2016. Nice high level overview for these that haven't already installed!

http://ift.tt/1Jw4txH


by Mark Jones via Everyone's Blog Posts - SharePoint Community

30% of organizations will adopt SharePoint 2016 immediately

We've be running a new poll on SharePoint-Community.net for the last few days and the scores on the doors are that a wapping 30% of orgs will adopt SharePoint 2016 immediately and only 7% of respondants say they will never install it. That's great news for Microsoft and also great news for companies like mine that haven't moved their products to Office 365 yet ;)

If you were one of the "immediates" - what's the driving factor behind upgrading straight away? 


by Mark Jones via Everyone's Blog Posts - SharePoint Community

Retrieving High Priority Tasks with SharePoint’s Query REST API

fullcalendar month view javascriptThis will be a quick post. Recently, when I wanted to make a REST call to retrieve all of the high priority tasks from a set of task lists, I figured it would be no big deal. I’d just add something into the querytext and be done with it. Unfortunately, syntax is always a cruel bedfellow.

I tried all sorts of things, like:

PriorityOWSCHCS:(1) High
PriorityOWSCHCS=(1) High
PriorityOWSCHCS='(1) High'
Priority:'(1) High'

etc.
Someone like Mikael Svenson (@mikaelsvenson) – search guru that he is – would just look at this and tell me immediately what to do, but I try not to bug him unless it’s something complicated. Oddly, I couldn’t find a single example out there of someone doing this. It would seem to be a common request: show me all of the high priority tasks in the Site Collection so that I can focus on them.

In this case, we’re showing those tasks on a fullcalendar on the home page of a parent site which has many subsites, each for a project. Fullcalendar is an excellent, full-featured JavaScript calendar widget that you can pretty easily add into a SharePoint page. You just have to feed it data in a format it can understand. So we want to retrieve all of those project tasks using the search API and massage them into the fullcalendar format.

The filtering solution turned out to be too easy:

Priority:1

Here’s the full code that I came up with for this part of my KnockoutJS view model:

// Only get tasks with Priority='(1) High'
var projectTasks = [];
$.ajax({
  url: _spPageContextInfo.webAbsoluteUrl + "/_api/search/query?" +
    "querytext=%27ContentTypeId:0x01080023AEF73C31A00C4C87FD5DB6FD82F6EE* Priority:1%27" +
    "&amp;selectproperties=%27Title,StartDateOWSDATE,DueDateOWSDATE,Path,Body,PriorityOWSCHCS%27",
  type: "GET",
  headers: {
    "accept": "application/json;odata=verbose",
  },
  success: function(data) {

    $.each(data.d.query.PrimaryQueryResult.RelevantResults.Table.Rows.results, function(index, item) {

      var searchResult = [];

      // Normalize the fields
      $.each(this.Cells.results, function(i, prop) {
        searchResult[prop.Key] = prop.Value; // { Value: prop.Value, ValueType: prop.ValueType };
      });

      projectTasks.push({
        calendar: "Project Tasks",
        color: "rgb(100,150,148)",
        title: searchResult.Title,
        path: searchResult.Path,
        eventDate: $.fullCalendar.moment(searchResult.StartDateOWSDATE),
        endDate: $.fullCalendar.moment(searchResult.DueDateOWSDATE)
      });
    });
  },
  error: function(error) {
    alert(JSON.stringify(error));
  }
});

If nothing else, the next time I need to do this, I’ll hit something when I search!


by Marc D Anderson via Marc D Anderson's Blog

How to make SharePoint online branding

Today I would like to write a few words about branding. I have to make branding for my company internal site and I would like to say that it was something new to me. I was working with SharePoint online and current post is based on this environment. Let me point one thing at the begging. Microsoft in general is against branding, especially if you want make some deep changes. I understand that, as I had cases that after some modification in SharePoint itself branding was destroyed. It's very important in case of Office 365 where some changes can be done by Microsoft without prior information. But in some cases site should look nice to the users, for example if it's central site of the company, with marketing or business information. It should be good looking. I will present my approach from my point of view as the guy who's not graphic skills. 

At the begging we need design for our site. We have to remember that we should avoid some features like flash or silverlight.  On other hand we can get really amazing results with HTML 5, javascript, Bootstrap, etc. You can find a lot of free designs on the Internet. For example you check this site. Let's download our template and then open it in Visual Studio or other editor. At the begging we should remove everything which will not be used in our project, like scripts, images, pages, etc. Usually we will stay with single page, scripts and css's. Also we should check if our project is not calling to external sites. It's not big deal but we should remove everything with external http links. In this case user will get warring about non secure content in every page refresh - it will very annoying to him. One more thing - images. Our master page can use for example slider or other solution with images. But it's important to put images in Master Page Gallery! Of course we can use image library and put the link in html code. Unfortunately in this case we will see delay during image loading, which make this approach not useful to us. The last project, which you can see below was 1.8 Mb. And the images were half of this size. Also big size has Font Awesome.

Master Page
Master Page

Ok, let's move to the SharePoint. To make our branding possible we have to activate for our site collection publish feature (Publishing Infrastructure): Site settings - > Site Collection Administration - > Site collection features and here we turn on SharePoint Server Publishing Infrastructure. It will take a while… Then we are going to Site Settings -> Site Features and turn on SharePoint Server Publishing. We can check that everything is in place if we can see Design Manager option in the menu.

Design Manager
Design Manager

And the design manager is new option in this version of SharePoint. More information you can find at the MSDN site. This amazing tool provide to us possibility to convert html project into master page. Let's move to Design Manager page. We will see there menu as below:

Design Manager Menu
Design Manager Menu

There are following options there:

2. Manage Device Channels – here we can configure display options base on device

3. Upload Design Files –  files loading to the server

4. Edit Master Pages – we can convert our project into master page here, and also we can create some SharePoint snippets

5. Edit Display Templates – we are checking display templates there

6. Edit Page Layouts – we create here new  page layouts

7. Publish and Apply Design – and here we can publish our master page

8. Create Design Package – Finally we can create package which can be reused in other projects.

It's time to move forward. Let's send our data to the Office 365 server. From design manager menu we select option Upload Design Files. We will see link to the  Master Page Gallery. We can click it and the library should be mapped as local network disk. And there we should load our data. One thing. This option works well with internet explorer, even Windows 10 Edge doesn't work correctly with this feature. If the previous operation wasn't successful you can copy the link, open new card in IE and after displaying content of the  master page gallery we can press option: Open with Explorer.

Master Page Gallery
Master Page Gallery

After some time content of the master page folder should be mapped as network drive. If it's still doesn't work you can check this link to try solve the problem. Create folder for our master page and load content of our project - do not load single files into the root, as we get a mess there. Next step is publishing of all items which were sent to the server. To avoid clicking item be item we can use option: Site Content and Structure, where we can publish multiple items wing one click.

Site Content And Structure

After publishing all files it's time to the final move. Go to the design manager and select option: Edit master pages, and then: Convert an HTML file to a SharePoint master page. We select our html page, which should become a master page. After some time our brand new master page should become visible. It's important that the status should be Conversion successful.

Convert to master page

If we get some errors we should remove code which is the source of the problem. Ok, it's time to publish our master page. Again move to master page gallery and again select our html  file and press publish. We do not click on the master page, which exits now there!

Small remark here. We always work with HTML file, not master page itself. It's the SharePoint task to synchronize all changes which we make to the page.

This article was originally posted at my personal blog.


by Tomasz Szulczewski via Everyone's Blog Posts - SharePoint Community

SharePoint 2016 Preview - Going Hybrid

With SharePoint 2016 Preview being released today one of the big new items in the list (Besides MiniRole) is Hybrid functionality. I, like everyone else, just had to jump in, take a look and setup Hybrid mode.

Accessing via CA

Microsoft made sure this was right on our landing page in CA and very easy to access.

A quick click on "Configure hybrid OneDrive and Sites Feature" and you are on your way to becoming a true (Or sorta of true) hybrid.

MY Site URL

Before you begin configuring anything you will need to give it your MySite URL.

The URL is http://ift.tt/1Ei2O2B. It does not need your user name and password as it will only be using this to redirect users and will use their authentication.

Select your Audience

Good news here is that we do not have to send everyone over to OneDrive we can send an audience. However you do have to have an audience compiled in the User Profile to add one here. If you are going to go use an audience then head over to your user profile application and compile one just like you would in SharePoint 2013.

Note* - With out relying on FIM 2010 anymore SharePoint 2016 User Profile Sync is much smoother. (IE. No User Profile Sync service = No stuck on starting) More on this in another blog.

Select Hybrid Features

Now that we have our people chosen (or everyone) now all we have to do is decide which features we want to Hybrid.

We can either redirect them for their OneDrive only or we can redirect them for OneDrive and Sites.

OneDrive Only

SharePoint places the new url on the user for their My Sites which in effect creates a redirect from on premise to Office 365 OneDrive when a User clicks on their One Drive.

OneDrive and Sites

Same as above but with the Hybrid Sites feature turned on. When this is enabled SharePoint redirects the Followed Sites list to Office 365. Every time a user follows a new site that Followed information is sent up to Office 365 using the users credentials via a web call to place it in their Followed List.

Conclusion

SharePoint has under gone some changes in this version behind the scenes even if the GUI's look the exact same. These also include some great Hybrid capabilities with search as well. With redirects and syncs this does allow a user to seamlessly move back and forth between the environments and this becomes even smoother if you are using a Web Application Proxy and ADFS to do SSO.


by Jeff Adkin via Everyone's Blog Posts - SharePoint Community

Tuesday, August 25, 2015

5 Stories You Need To Read About SharePoint 2016 Preview

Microsoft has delivered on its promise of releasing SharePoint 2016 Preview before the end of August. As we work through our evaluations of the new features and interface, several stories about the new version of the collaboration platform caught our eye.

read more


by via SharePoint Pro

SharePoint Server 2016 encountered an error during setup

SharePoint Server 2016 Preview just came out, and a lot of you have probably already downloaded it, or plan to download it and test it to find out what is new. Sometimes when installing SharePoint 2016 I had this error randomly, and I Saw on twitter that I wasn’t the only one, so I decided to make a blog about it.

Basically, when installing SharePoint Server 2016 you get the “Microsoft SharePoint Server 2016 encountered an error during setup”, and when the error page opens you see its error 1603.

SharePoint Server 2016 encountered an error during setup

In my case, I only had to restart the installer and everything went fine, but in the past when the installer crashed, it used to be because the SharePoint VM only had one core. So, try to re-start the SharePoint setup, and if that doesn’t work, make sure your SharePoint VM has at least two cores.
Let me know in the comments if you had this error!

Leave a comment and don’t forget to like the Absolute SharePoint Blog Page  on Facebook and to follow me on Twitter here  for the latest news and technical articles on SharePoint.  Also, don’t forget to check out SharePoint Community.Net for more great SharePoint Content.

The post SharePoint Server 2016 encountered an error during setup appeared first on Absolute SharePoint Blog by Vlad Catrinescu.


by Vlad Catrinescu via Absolute SharePoint Blog by Vlad Catrinescu

Activate Durable Links in SharePoint 2016

One of the great new features in SharePoint 2016 is Durable Links. Durable links make sure that documents do not change URLs when they are being changed document libraries, or renamed.

However, this feature does not come activated by default. In this blog post I will show you the simple procedure to activate Durable Links in SharePoint 2016. First, go to Site Settings.

Activate Durable Links in SharePoint 2016

Afterwards, go in Site Collection Features

Activate Durable Links in SharePoint 2016

And finally, activate the “Document ID Service” feature. It is not activated by default.


Activate Durable Links in SharePoint 2016

Now, documents will start having URLS like this:

Before: http://ift.tt/1LvzXI7

After: http://ift.tt/1hZS92V


Note: After playing with the SharePoint 2016 Preview, it seems that durable links work for renaming documents, but they don’t work when moving document libraries, I get an error like the screenshot below. I will update the blog post once It’s either a confirmed bug in Preview.


Leave a comment and don’t forget to like the Absolute SharePoint Blog Page  on Facebook and to follow me on Twitter here  for the latest news and technical articles on SharePoint.  Also, don’t forget to check out SharePoint Community.Net for more great SharePoint Content.

The post Activate Durable Links in SharePoint 2016 appeared first on Absolute SharePoint Blog by Vlad Catrinescu.


by Vlad Catrinescu via Absolute SharePoint Blog by Vlad Catrinescu

SharePoint and Dynamics NAV – Automate Receiving 3 Different Ways

There are many options when creating the receipt and invoice documents in either SharePoint or Microsoft Dynamics NAV that ensure you can accommodate your company’s specific procurement process.  Whether you have centralized receiving, decentralized receiving or a combination of the two, with DynamicPoint you may configure the application to automate receipts in Dynamics NAV based on your unique requirements.

That is right, the good news is DynamicPoint’s Requisition Management application supports various scenarios of receiving that allow a non-Dynamics user to create a requisition directly within SharePoint, submit it for review, upon approval integrate a Purchase Order in Microsoft Dynamics NAV and ultimately notate a goods receipt in NAV via the following configurable options:

  1. Centralized Receiving
    Some organizations, typically those procuring a lot of inventory, will have a dedicated receiving department that will be in charge of receiving the purchased goods and entering the purchase receipt in Dynamics NAV, and therefore completing part 2 of a three way match.   The resulting process looks like this:  Rec1
  2. Decentralized Receiving
    Then there is the scenario when the person who created the requisition is responsible for denoting that the item has been received.  This is more often the case for organizations that are purchasing services as opposed to goods.  As the requisitioner is not a Dynamics NAV user, the resulting process flow looks like this:
    Rec2
  3. No Receiving
    So speaking of the procurement of services as opposed to goods, what if there is no such thing as a goods receipt and the vendor only sends an invoice?  In that case the 3 way match loses a step and becomes a 2 way match.  The resulting process is as follows:
    Rec3
  4. Hybrid – Receiving & Invoice Match Both 
    So if we all weren’t confused by this point, the last scenario our application supports is a hybrid environment where some items are received and others are just invoiced.  That makes our diagram a little more intricate and looks as follows:
    Rec4

As highlighted above, there are many different flavors of creating the receipt and invoice documents in either SharePoint or Microsoft Dynamics NAV based on the company’s specific procurement process.  The good news is our application supports all of these scenarios and can be configured to accommodate the various hybrid methods as well.

Check out our online video to see the process in action:


Contact DynamicPoint today with any questions.


By Mike Marcin, DynamicPoint – SharePoint Expense, Invoice & Requisition Management applications built exclusively for Dynamics GP & NAV.

The post SharePoint and Dynamics NAV – Automate Receiving 3 Different Ways appeared first on SharePoint Blog.


by Mike Marcin, DynamicPoint via SharePoint Blog

SharePoint Search & OneDrive for Business - A perfect combination.

SharePoint Search & OneDrive for Business – A perfect combination.


The importance of (SharePoint) Search

Office 365 offers many possibilities to build solutions in order to better communicate and collaborate within an organization. The cloud-based service has many capabilities to store information: OneDrive for Business, Outlook, Yammer, OneNote and of course SharePoint Online. Likewise, retrieving or accessing information can be done in various ways. For one, all of the O365 products have their own search functionality. Also, there is Delve. This is an enormously powerful tool that brings information to the user.

In this piece we focus on the search functionality of SharePoint Online. This search functionality is a crucial component of the O365 environment. In fact, performing search queries is inherently tied to our everyday internet use. Proof of this are the enormous amount of searches executed daily by the different search engines. Just the Google search engine alone performs more than 3 billion searches every day. The use of ‘search’ to find the correct information has become part of our online DNA.

The use of ‘search’ to find the correct information has become part of our online DNA.

The above findings can be extrapolated to the corporate collaboration environment (in Office365) of a company. A good, comprehensive and deliberate search area in Office 365 is of great importance. Just think how frustrating it can be not finding the desired information. Needless to say this comes at the expense of the user adoption. It is difficult to embrace an environment which frustrates you as anvind end user. In addition a solid search center is important to guarantee the productivity of the end user. No one wants to spend (and lose) hours seeking for his/her information.

Imagine one central, instantly searchable space for information stored on the whole Office 365 platform; Yammer, SharePoint or even OneDrive for Business. Furthermore, imagine that this search can be performed without leaving the current webpage. Wouldn’t that be great? In this post, we take a closer look at the ability to, starting from the SharePoint Search center, search into your personal OneDrive for Business files.

How to: Search for your personal OneDrive for Business files within SharePoint Online

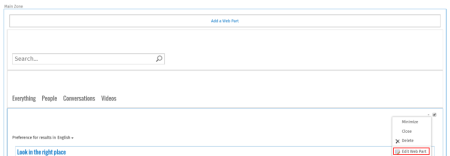
In SharePoint Online, it is possible to define different Result sources. These sources allows a user to limit searches to certain content. These result sources can be used within the SharePoint Search Verticals. These are customized for searching specific content. They display search results that are filtered and formatted for a specific content type or clas.  By default, SharePoint has four predefined search verticals: Everything, People, Conversations and Videos. These search verticals are in fact different pages. In case one of these verticals is selected, a user is navigated to another page.

The out-of-the-box search box on the search center page looks like this;

search verticals

The previously mentioned standardized set of Result Sources can be modified; Additional result sources can be created, or one can remove non-applicable result sources. In this blog, a special MyOneDrive Result Source will be added. This result source allows a user to search within his own OneDrive files, without leaving the SharePoint environment. Especially for new users, this is very useful.

1.    Create a new Result Source

First of all, a special a new Result Source has to be created. Before adding the result source, verify that you use the administrator account. You can directly navigate to the page by using the link below:

https://tenantnamehttp://ift.tt/1ETJzHM

Or you can follow this procedure


  • Go to the Office 365 admin page:
    http://ift.tt/1yrP0eS
  • Click SharePoint
  • Click Search
  • Click Manage Result Sources

Here you can create a New Result Source.

  • In the General Information section, provide a name (something like SharePoint Online OneDrive) and short description.
  • For the Protocol use local SharePoint.
  • In the Query Transform section you have to specify the to-be-used Query for the new Result Source. The transform replaces contextual query variables with values pertaining to the query context. Use the following query {searchTerms} path:https://tenantnamehttp://ift.tt/1WQtnCb.

 Query transform

Don’t forget to replace tenant name with your actual tenant name.

  • Click Save

2.   Create search-results page for OneDrive for Business

Once the search result source is created, it can be used in the search center. Navigate to you your SharePoint search center. Normally, this will is a separate site collection. Since every search source is actually a separate page (.aspx), a new page is to be created first.

  • Go to your Site contents > Pages.
  • Add a new page. Give it an appropriate name (OneDriveResults) and
  • Click create.

add page

3.    Configure the new Search Results page

Now that a new Search Results Page is created, it has to be configured so that only OneDrive for Business results are shown.

  • Open the newly created page in Edit-mode
  • Edit the Search Results Web-part

search results web part

  • In the Search Results Web Part tool pane, click Change Query.
  • In the Select a query section; choose the newly created result source

Result Source Web Part

Unfortunately, simply selecting the new OneDriveforBusiness result source is not the end. Using this new result source, without further configuration would cause items/files of colleagues showing up.

Recalling the new result source, this is not illogical. The search results are limited to the elements following the url: http://tenantnamehttp://ift.tt/1WQtnCb. For example, files shared by a colleague on their OD4B follow the same path.

To address this issue, an additional property filter is needed. As can be seen on the image above, every user’s name is incorporated in the URL of his/her OD4B. Knowing that a person’s name is included in the URL is key to the solution.

In the Change query window the following steps are required

  • In the Select Property filter, click –Show all Managed Properties—

managed properties

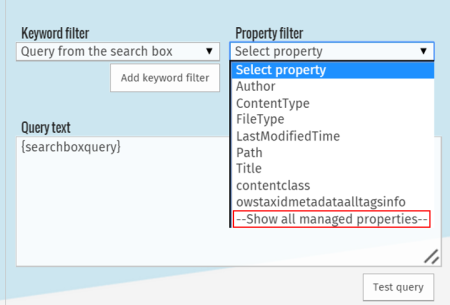
  • Look for the SPSiteURL property
  • Then select ‘Contains’ and ‘Name of the user who runs the query’.

name of the user

  • By clicking add Property filter, the Query text should like this: {searchboxquery} SPSiteURL:{User.Name}
  • Now anything that matches the searchbox query your personal my site will be shown. To limit this so that only documents (which are stored on your OneDrive for Business) are shown, add the following to your search query. (FileExtension:doc OR FileExtension:docx OR FileExtension:xls OR FileExtension:xlsx OR FileExtension:ppt OR FileExtension:pptx OR FileExtension:pdf)
  • Click OK.

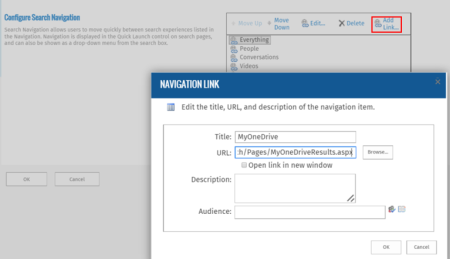
4.   Add search vertical

Now the search results are limited to a user’s personal OneDrive for Business files. The last thing to do is add ‘MyOneDrive’ as a search vertical to your search results page.

  • Go to Search Settings via the site settings page.
  • In the Configure Search Navigation, click add link.

search vertical

  • Click two times OK.

Now that everything is set, the search page can be used. To test if all things are set up correctly, 5 documents were added to my OD4B.

onedrive

When using the MyOneDrive search vertical, a wildcard search returns the following results:

Results

 Conclusion

Having an integrated OneDrive for Business Search Source in your corporate SharePoint environment is relatively simple and can be done with standard out-of-the box functionality. Doing so, a user doesn’t have to switch between different tabs and stays within the SharePoint environment. This enhances the search experience, which undoubtedly has a positive effect on the user adoption of the environment.


Frederik De Wieuw

Frederik De Wieuw

Business Consultant @ Spikes


Frederik De Wieuw works as a Business Consultant for Spikes NV. He has a passion for finding appropriate Office 365 solutions to create added business value. In order to do so, he likes to explore the limits of the standard Out-of-the box functionalities.


by Frederik De Wieuw via Everyone's Blog Posts - SharePoint Community

Office 365 Authentication using MVC application and retrieving contacts using Office 365 api

Office 365 Authentication

Office 365 Authentication using Visual Studio MVC application

Lets create an MVC application which has it's back end as office 365. In order to try this out, you just need to have Visual Studio installed on your machine and Office 365 account.

Lets start by creating a new project.

  1. Select Web -> ASP.Net Web Application and click OK Office365Authentication-NewProject
  2. Click on Change Authentication                                 ChangeAuthentication
  3. Select No Authentication. Click OK.                            NoAuth

Setting up the tools to connect to Office 365

Lets first install the Office 365 API Tools which is required for connecting to the Office 365 API.

  1. In Visual Studio, go to Tools/Extensions
  2. Search for Office 365
  3. Install the Office 365 API Tools

Next, lets add a connected service

  1. Right click on the project -> Add -> Connected Service AddConnectedService
  2. Click on Register your app                                         RegisterApp
  3. When prompted, sign into your Office 365 account
  4. We need to set permissions here. Since we need to read from Contacts, click on Contacts -> permissions , check 'Read your contacts', click Apply Permissions
  5. Click on Users and Groups and check 'Sign you in and read your profile UserProfilePermission
  6. Click on app properties and remove the http address, click Apply and OK AppProperties

This will install the required components including the Outlook services and Discovery services which we will be using to retrieve information from Office 365.

Configuring the authentication

Setting the https endpoint

  1. In the project properties, set SSL Enabled to True
  2. Copy the SSL URL property
  3. Right-click the project, and select Properties -> Web tab -> in Servers section -> set Project URL to the SSL URL created above

We need to install some NuGet packages to the project. Right click on the project and click on Manage NuGet packages.                                                                               Manage-NuGet

Ensure you have selected online on the left, search and install the following NuGet packages:

  1. Active Directory Authentication Library
  2. EntityFramework
  3. Microsoft.Owin.Host.SystemWeb
  4. Microsoft.Owin.Security.Cookies
  5. Microsoft.Owin.Security.OpenIdConnect

Configure the Token Cache database

  1. Right click on App_Data and select Add -> New Item.
  2. Name the db ADALTokenCacheDb

Update the web.config to reflect the db name

<connectionStrings>
<add name="DefaultConnection"
connectionString="Data Source=(LocalDB)\v11.0;AttachDbFilename=|DataDirectory|\ADALTokenCacheDb.mdf;Integrated Security=True" providerName="System.Data.SqlClient" />
</connectionStrings>

  1. Right click on the project and select Add New-> OWIN startup class. Enter name of the file as Startup.cs (This is found under Web -> General)
  2. Add the following namespace references (Update your namespace for Models and Utils):                         

    using Microsoft.IdentityModel.Clients.ActiveDirectory;
    using Microsoft.Owin.Security;
    using Microsoft.Owin.Security.Cookies;
    using Microsoft.Owin.Security.OpenIdConnect;
    using Office365Authentication.Models;
    using Office365Authentication.Utils;
    using Owin;
    using System;
    using System.IdentityModel.Claims;
    using System.Threading.Tasks;
    using System.Web;
    using Microsoft.Owin;

  3. Add the following method                                                                                                                             

    public void ConfigureAuth(IAppBuilder app)
    {
    app.SetDefaultSignInAsAuthenticationType(CookieAuthenticationDefaults.AuthenticationType);

    app.UseCookieAuthentication(new CookieAuthenticationOptions());

    app.UseOpenIdConnectAuthentication(
    new OpenIdConnectAuthenticationOptions
    {
    ClientId = SettingsHelper.ClientId,
    Authority = SettingsHelper.Authority,

    Notifications = new OpenIdConnectAuthenticationNotifications()
    {
    // If there is a code in the OpenID Connect response, redeem it for an access token and refresh token, and store those away.
    AuthorizationCodeReceived = (context) =>
    {
    var code = context.Code;
    ClientCredential credential = new ClientCredential(SettingsHelper.ClientId, SettingsHelper.AppKey);
    String signInUserId = context.AuthenticationTicket.Identity.FindFirst(ClaimTypes.NameIdentifier).Value;

    AuthenticationContext authContext = new AuthenticationContext(SettingsHelper.Authority, new ADALTokenCache(signInUserId));
    AuthenticationResult result = authContext.AcquireTokenByAuthorizationCode(code, new Uri(HttpContext.Current.Request.Url.GetLeftPart(UriPartial.Path)), credential, SettingsHelper.AADGraphResourceId);

    return Task.FromResult(0);
    },
    RedirectToIdentityProvider = (context) =>
    {
    // This ensures that the address used for sign in and sign out is picked up dynamically from the request
    // this allows you to deploy your app (to Azure Web Sites, for example)without having to change settings
    // Remember that the base URL of the address used here must be provisioned in Azure AD beforehand.
    string appBaseUrl = context.Request.Scheme + "://" + context.Request.Host + context.Request.PathBase;
    context.ProtocolMessage.RedirectUri = appBaseUrl + "/";
    context.ProtocolMessage.PostLogoutRedirectUri = appBaseUrl;

    return Task.FromResult(0);
    },
    AuthenticationFailed = (context) =>
    {
    // Suppress the exception if you don't want to see the error
    context.HandleResponse();
    return Task.FromResult(0);
    }
    }

    });
    }

  4. Call this method from Startup.Configuration as follows:                                                                               

    public void Configuration(IAppBuilder app)
    {
    ConfigureAuth(app);
    }

Let's use part of the code in the github project Office 365 single-tenant MVC project.

  1. Copy the SettingsHelper.cs into the Utils folder
  2. Copy the ApplicationDbContext.cs and the ADALTokenCache.cs to the Models folder
  3. Copy the _LoginPartial.cshtml file into the Views > Shared folder
  4. Ensure that you update the namespace in the copied files

Now lets add the sign in and sign out functionality

  1. Right click on Controllers folder and add a blank controller called AccountController. Replace the existing AccountController
  2. Replace the namespace with                                                                                                                          

    using Microsoft.Owin.Security;
    using Microsoft.Owin.Security.Cookies;
    using Microsoft.Owin.Security.OpenIdConnect;
    using System.Web;
    using System.Web.Mvc;

  3. Delete the index method and add the following:                                                                                          

    public void SignIn()
    {
    if (!Request.IsAuthenticated)
    {
    HttpContext.GetOwinContext().Authentication.Challenge(new AuthenticationProperties { RedirectUri = "/" }, OpenIdConnectAuthenticationDefaults.AuthenticationType);
    }
    }
    public void SignOut()
    {
    string callbackUrl = Url.Action("SignOutCallback", "Account", routeValues: null, protocol: Request.Url.Scheme);

    HttpContext.GetOwinContext().Authentication.SignOut(
    new AuthenticationProperties { RedirectUri = callbackUrl },
    OpenIdConnectAuthenticationDefaults.AuthenticationType, CookieAuthenticationDefaults.AuthenticationType);
    }

    public ActionResult SignOutCallback()
    {
    if (Request.IsAuthenticated)
    {
    // Redirect to home page if the user is authenticated.
    return RedirectToAction("Index", "Home");
    }

    return View();
    }

Update the MVC application to retrieve and show the contact information from Office 365

Now, lets update the MVC application to retrive the contact information.

  1. Add a class to the Models folder called MyContact

    Update the code as

    public class MyContact
    {
    public string Name { get; set; }
    }

  2. Add an empty controller MVC 5 Controller - Empty to the Controllers folder called ContactsController
  3. Add the usings (Update your project namespace for Models and Utils)                                                       

    using Microsoft.IdentityModel.Clients.ActiveDirectory;
    using Microsoft.Office365.Discovery;
    using Microsoft.Office365.OutlookServices;
    using Office365Authentication.Models;
    using Office365Authentication.Utils;
    using System.Collections.Generic;
    using System.Security.Claims;
    using System.Threading.Tasks;
    using System.Web.Mvc;

  4. Add an authorize attribute                                                                                                                             

    [Authorize]
    public class ContactsController : Controller

  5. Change the index method to aysnchronous                                                                                                  public async Task<ActionResult> Index()
  6. Add the following code to index method                                                                                                      

    List<MyContact> myContacts = new List<MyContact>();

    var signInUserId = ClaimsPrincipal.Current.FindFirst(ClaimTypes.NameIdentifier).Value;
    var userObjectId = ClaimsPrincipal.Current.FindFirst("http://ift.tt/1xhjXp4").Value;

    AuthenticationContext authContext = new AuthenticationContext(SettingsHelper.Authority, new ADALTokenCache(signInUserId));
    try
    {
    DiscoveryClient discClient = new DiscoveryClient(SettingsHelper.DiscoveryServiceEndpointUri,
    async () =>
    {
    var authResult = await authContext.AcquireTokenSilentAsync(SettingsHelper.DiscoveryServiceResourceId, new ClientCredential(SettingsHelper.ClientId, SettingsHelper.AppKey), new UserIdentifier(userObjectId, UserIdentifierType.UniqueId));

    return authResult.AccessToken;
    });

    var dcr = await discClient.DiscoverCapabilityAsync("Contacts");

    OutlookServicesClient exClient = new OutlookServicesClient(dcr.ServiceEndpointUri,
    async () =>
    {
    var authResult = await authContext.AcquireTokenSilentAsync(dcr.ServiceResourceId, new ClientCredential(SettingsHelper.ClientId, SettingsHelper.AppKey), new UserIdentifier(userObjectId, UserIdentifierType.UniqueId));

    return authResult.AccessToken;
    });

    var contactsResult = await exClient.Me.Contacts.ExecuteAsync();

    do
    {
    var contacts = contactsResult.CurrentPage;
    foreach (var contact in contacts)
    {
    myContacts.Add(new MyContact { Name = contact.DisplayName });
    }

    contactsResult = await contactsResult.GetNextPageAsync();

    } while (contactsResult != null);
    }
    catch (AdalException exception)
    {
    //handle token acquisition failure
    if (exception.ErrorCode == AdalError.FailedToAcquireTokenSilently)
    {
    authContext.TokenCache.Clear();
    //handle token acquisition failure
    }
    }

    return View(myContacts);

Now, lets add the view to the Contacts controller:

  1. In the Views folder, right click on Contacts folder -> Add View
  2. Enter view name as Index
  3. Select List as the template
  4. Select MyContact as model
  5. Click on Add

In the Shared folder, open the _Layout.cshtml file

  1. Add an actionlink to the MyContacts page to get a navigation link to the MyContacts view so that it is updated as:                                                                                                                                                     

    <div class="navbar-collapse collapse">
    <ul class="nav navbar-nav">
    <li>@Html.ActionLink("Home", "Index", "Home")</li>
    <li>@Html.ActionLink("About", "About", "Home")</li>
    <li>@Html.ActionLink("Contact", "Contact", "Home")</li>
    <li>@Html.ActionLink("My Contacts", "Index", "Contacts")</li>
    </ul>
    @Html.Partial("_LoginPartial")
    </div>

Now if you run the application, and click on the MyContacts link, it should show the contacts in your Office 365 site!

When prompted, login to your Office 365 account and accept the permission requirements. Output

Check out the original article at my blog -  Office 365 Authentication using Visual Studio MVC application


by Prashanth Padebettu via Everyone's Blog Posts - SharePoint Community